It was a quiet Saturday afternoon when I looked down at the empty plastic bottle of commercial kitchen spray, the third one I’d thrown away in a single month. The pungent, synthetic scent of it always made me sneeze, and I couldn’t ignore the list of unpronounceable chemicals on the label.
I was fed up. Not just with the chemical odor and the waste, but with the endless cycle of buying expensive bottles that did who-knows-what to my surfaces and my lungs. “There has to be a better, cleaner way,” I thought.
Then my eyes drifted to a large bowl of citrus fruits on my counter—fresh oranges, a couple of juicy grapefruits, and a half-eaten lemon. A scent of fresh, vibrant oils wafted from them. I remembered a friend mentioning how they made their own dish soap. Could I?
That was the spark. I plunged into research, a little wary at first (would it really work?), but soon, I was experimenting in my kitchen, a mess of jar, water, and sticky peels.
What I discovered transformed my cleaning routine completely. It wasn’t just a “hack.” It was an ancient, effective, and beautifully simple way to create powerful, non-toxic cleaners from the very “waste” I was creating every day.
Today, I’m thrilled to share that journey and show you precisely how you can stop buying chemical sprays and instead, brew up your own batch of fruit-powered cleaners. We’re talking fresh scents, sparkly surfaces, and the deep satisfaction of turning trash into a multi-purpose cleaning treasure. Let’s do this!
The Secret Power of Fruit Peels
Wait, before you roll your eyes at another “hippie DIY,” let’s get into the science of it, just for a moment. It’s actually fascinating. What makes fruit peels, especially from citrus fruits and pineapple, such potent cleaners?
D-Limonene: This is the magic ingredient in citrus oils. You know that strong, wonderful smell of a fresh orange? That’s D-Limonene. This compound is a powerful natural solvent. It dissolves fats, oils, and grease. This is why it’s so effective against that stubborn residue on your stovetop or sticky grime on counters.
Acidity (Citric and Ascorbic Acid): Lemon, lime, and grapefruit peels are rich in citric acid. This natural acid is a master at breaking down tough mineral deposits, like water spots and soap scum. It also provides that beautiful, streak-free shine.
Natural Scent: The essential oils in fruit peels provide a strong, natural, and uplifting aroma. Forget the artificial, head-splitting chemical odors; your home will smell like a fresh orchard, which is so much more inviting.
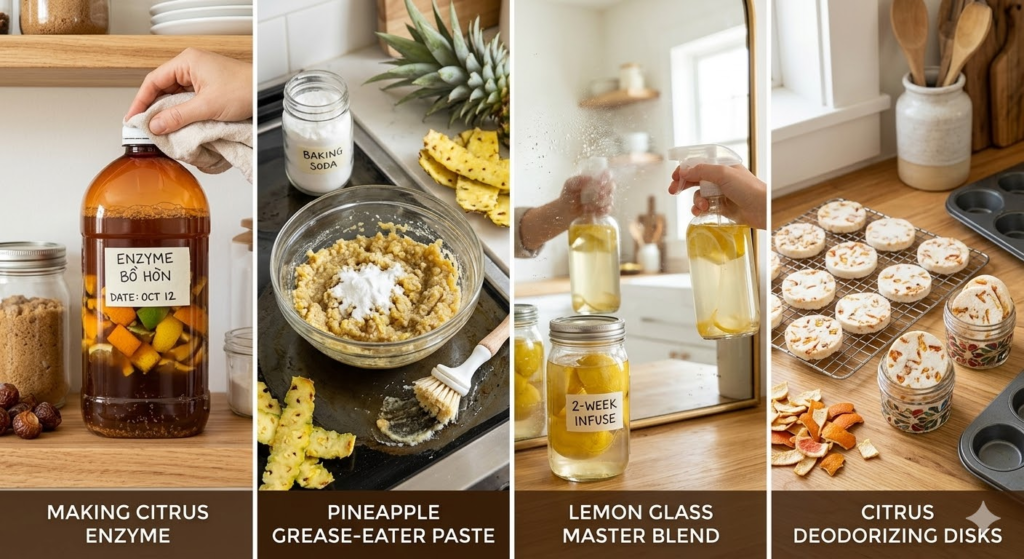
Method 1: The All-Powerful Citrus Enzyme Solution
This is the holy grail. I call it my “Green Gold.” An enzyme-based cleaner is not just a soap; it’s alive. This multi-purpose wonder is created through fermentation, where microorganisms break down the fruit peels, releasing powerful natural enzymes and detergents. It’s effective, incredibly cheap to make, and has a fascinating history!
The Simple Science: I first read about this from a Vietnamese home-cleaning group on social media, where they called it “Enzyme Bồ Hòn” (Sapindus or Soapnut Enzyme). The concept is the same whether you use soapnuts or fruit peels: microorganisms consume sugars (from the fruit and added brown sugar), multiply, and produce alcohol, organic acids, and those brilliant cleaning enzymes. It takes patience, but it’s worth it.
The Base Recipe:
You’ll need:
A large plastic container (glass is risky as fermentation creates gas). I use an old 5-liter plastic water jug.
Brown Sugar or Molasses (the “food” for the enzymes).
Water.
Fruit Peels: My favorite is a mix of orange, lemon, lime, and grapefruit. Avoid very rotted fruit, but soft or bruised peels are fine. You can collect these in your freezer until you have enough.
Optional: A few soapnuts (Bồ hòn) if you want to make the “Bồ hòn” version. They add natural saponins for more suds.
The Golden Ratio:
The ratio that has worked wonders for me is simple: 1 part Brown Sugar : 3 parts Fruit Peels : 10 parts Water.
Step-by-Step Guide:
Prepare the Mixture: Dissolve your brown sugar in the water inside your plastic container. Add all your fruit peels and, if using, a handful of soapnuts.
Seal and Label: Screw the cap on, but not too tight. Fermentation is a gaseous process, and you don’t want a messy surprise. Label it with the date.
The First Month (The Critical Month): Place the jar in a cool, dark spot (like under your sink). You must “burp” the jar every single day. Gently and slowly open the cap just until you hear a “pffffft” of gas releasing. Then, tighten it back up. This prevents pressure buildup.
The Rest of the Time: After a few weeks, the fermentation will slow down. You can start burping it every few days. The total fermentation process takes about 3 months. You’ll know it’s ready when the liquid turns a beautiful, amber-gold color and the peels have mostly sunk to the bottom. It should have a slightly sour, yeasty, fruity smell, which I find delightful. If it smells rotten, a bad bacteria got in; throw it out and start over.
Strain and Use: Strain the glorious amber liquid into a glass bottle. The leftover mush can go straight into your compost pile. Congratulations! You now have a concentrated, all-natural cleaning powerhouse.
How to Use Your Green Gold:
Dilution is Key: This is a concentrate! For an all-purpose spray, dilute 1 part Enzyme to 10 parts Water in a spray bottle. Use it on counters, floors (it’s amazing on tile and hardwood!), cabinets, and even toilets.
Stiff Grime: Use it less diluted or even straight on tough grease. It’s a beast on ovens and greasy pots. Let it sit for 10-15 minutes and then scrub.
Dish Soap: It works as an incredible, natural, and non-toxic dish soap. It won’t have a mountain of suds (which are just chemical foamers anyway), but it will cut right through grease, and your dishes will have a brilliant shine.
Method 2: Lemon Power for Sparkly Glass and Faucets
Remember how I said the citric acid in lemons is great for mineral deposits? This is the perfect example. Forget that blue window cleaner in the aerosol can that always leaves a film. I made my own and I’ve never looked back.
The “Glass Master” Blend:
1 cup Water
1 cup Vinegar (the classic cleaner)
The peel from 1 Lemon
Step-by-Step:
Infuse the Vinegar: This is the easiest trick in the book. Place your lemon peels into a jar. Pour the vinegar over them. Seal and let it sit in a dark cupboard for 2 weeks. This is called infusing. The vinegar will draw all the essential oils and citric acid from the lemon peels, giving it that D-Limonene power and a much nicer, less pungent scent.
Combine and Spray: After two weeks, strain the lemon-infused vinegar into your spray bottle. Add the water. Give it a gentle shake.
The Magic in Action: Spray this mixture directly onto your windows or mirrors and wipe clean. For stubborn water spots on glass shower doors, spray it on and let it sit for 10 minutes to allow the acid to dissolve the mineral buildup. Wipe with a microfiber cloth for a lint-free, crystal-clear finish.
Chrome Faucets: This is my favorite part. Spray the lemon master blend all over dull, water-spotted faucets. The acid will make the chrome shine like brand new with almost zero scrubbing.
Method 3: Pineapple Polishing Paste for Grease and Grout
This one is a total hidden gem! I was cutting up a pineapple one day, a delicious but very peel-heavy fruit, and I got that spark again. “Could these rough, sweet peels be useful?” Oh, you bet! Pineapple has natural bromelain, a enzyme that helps break down proteins and fats. Combine that with a mild abrasive, and you have a miracle paste.
The “Scrub It Off” Paste:
Pineapple Peels from one fruit
A little water (about 1-2 cups)
Baking Soda (the ultimate cleaning companion)
Step-by-Step:
Make Pineapple “Water”: Roughly chop your pineapple peels. Put them in a pot and just cover them with water. Bring to a boil, then reduce heat and let it simmer for about 20 minutes. You’ll be left with a concentrated, sweet-smelling, and powerful pineapple liquid. Let it cool.
Form a Paste: Take a small bowl and mix baking soda with your cool pineapple water to create a thick, spreadable paste.
Scrub with Power:
For Grout: Use an old toothbrush to apply this paste directly onto dirty, discolored grout lines between tiles. Let it sit for 10 minutes, then scrub. The baking soda provides the abrasion, and the pineapple enzymes lift the dirt. Rinse clean. The grout will look refreshed.
For a Greasy Stovetop: This is where I use it most! Spread a layer of the pineapple-baking soda paste all over a sticky, grease-stained stovetop or oven door. The pineapple enzymes go to work dissolving the oils, while the baking soda gives you that satisfying, deep-cleaning scrub. Wipe clean with a damp cloth for a sparkling, grease-free surface that smells naturally fresh. It’s an absolute game-changer.
4. Citrus Deodorizing Disks for Every Corner
This is a beautiful and effective way to deal with one of my biggest pet peeves: lingering odors in small spaces. Those “gel” air fresheners that always made me sneeze? Never again. This is a non-toxic way to create beautiful-smelling disks from your peels and basic baking soda.
The Base:
2 cups Baking Soda: This is our odorless base that absorbs smells.
3/4 cup Water
The Peels from 2 Oranges or 1 Grapefruit
Optional: 10-15 drops of Orange or Lemon Essential Oil for an extra burst of scent.
Muffin Tin (or any small, round mold)
Step-by-Step:
Prepare the Citrus Scent: The best way to get that powerful citrus scent is to blend the peels with the water in a food processor. This creates a powerful, fragrant slush. If you don’t have a food processor, mince the peels very finely.
Mix the Dough: In a large bowl, combine the baking soda with the citrus slush and the essential oils. Mix with your hands until it has the consistency of a thick, fragrant paste or damp sand.
Form the Disks: Press the mixture into a muffin tin or silicon mold, pressing firmly to pack it well. This makes about 8-10 disks.
Dry and Use: Let them air-dry for 2-3 days until they are completely rock-hard. Carefully pop them out of the mold. Your disks will have a subtle, refreshing, natural citrus scent.
Place and Refresh: Put one or two disks into a small, open jar and tuck them into any corner of your home that needs deodorizing: the bathroom (behind the toilet), inside the trash can, your car’s cup holder, or your gym bag. They absorb bad odors and release a subtle, natural scent. When the scent begins to fade, a little spritz of water will “reactivate” it for another week or two.
5. Microwave Cleaner: The Steam Power of Citrus
This is the fastest, easiest, and most satisfying hack in the entire list! Cleaning a dirty microwave is a chore that most of us despise. The splattered, hardened food feels impossible to remove. This 5-minute trick uses steam to soften the gunk, and the citrus to dissolve the stains.
What You Need:
A Microwave-Safe Bowl
1 cup Water
1/2 cup Lemon or Orange Peels (fresh are best, but frozen work too)
Step-by-Step:
Combine: Place your citrus peels in the bowl and cover with the water. No fancy equipment is needed.
Steam and Soften: Place the bowl in the microwave. Run the microwave on high for 3-5 minutes. The goal is to get that liquid to boil, creating a hot, citrus-infused steam that fills the entire microwave interior. This is the critical step. The steam and heat will work their way into every crack and cranny, loosening all the hardened food and splatters.
Sit and Work: When the microwave stops, do not open the door. Let it sit closed for an additional 2 minutes. This allows the steam to continue working its magic, and the citrus oils to break down stains.
Wipe and Marvel: Now, open the door. Carefully remove the (very hot!) bowl. Use a simple damp cloth or sponge to wipe down the interior walls, floor, and the ceiling. The gunk will simply melt away, and the powerful lemon-D-Limonene will remove all stains. Your microwave will be clean, odor-free, and sparkle as if it were brand new. It’s a true magic trick!
6. Orange or Lemon Vinegar for Floor Cleaning Magic
This is similar to our Glass Master blend, but formulated specifically for floor surfaces. I can’t stand walking barefoot on a sticky floor, but I also hate the smell of harsh floor cleaners. I found that this lemon-vinegar blend is the absolute best solution. It cleans, dissolves dirt, and leaves a fresh, uplifting scent with zero residue.
The “Walk-Easy” Blend:
1/2 bucket Warm Water
1 cup Orange or Lemon-Infused Vinegar (using the simple 2-week infusion method)
Step-by-Step:
Create Your Scented Base: Use Method 2 to make your large batch of infused vinegar. This is an incredible step that takes only 5 minutes to prepare, and in two weeks, you’ll have a goldmine of cleaning power.
Dilute and Mop: For your standard floor cleaning, mix the infused vinegar with warm water in your mop bucket.
Mop and Shine: Use your standard mop to clean your floors. The warmth of the water helps the cleaner work, the vinegar provides the streak-free shine, and the citrus oils dissolve dirt and grime without leaving any harsh, sticky residue. Your floors will dry quickly and smell incredibly fresh. It works brilliantly on tile, linoleum, and sealed hardwood floors. Just be sure to always test a small, hidden area first if you are unsure. This floor cleaner changed my perspective and made me actually enjoy mop day!
7. Trash Can Refresher: The Easiest Step of All
This is almost too simple to call a “method,” but it’s a tiny action with a massive result. If there is one smell in my home that is a pure anxiety trigger, it’s a smelly trash can. We’ve all been there: a hint of rot or staleness that hits you every time you walk by. For a long time, I tried spraying it with chemicals, only to create a “lemon-trash” scent that was even worse. This simple, free, and non-toxic solution is now a permanent part of my routine.
What You Need:
Fresh Citrus Peels (Lemon, lime, orange, or grapefruit). Simply save a piece of peel from your breakfast fruit or an orange you enjoyed.
Step-by-Step:
Use a Fresh Peel: The moment you have a used-up lemon, lime, or orange, take a quick moment to drop that peel directly into the very bottom of your kitchen trash can.
The Silent Scents-ation: This tiny act does two powerful things:
Odor Absorption: The peel itself will help absorb some of the foul odors emanating from the bin.
Natural Air Freshener: Most importantly, every time you open the trash lid to throw something away, you’ll be met with a subtle, refreshing burst of fresh citrus scent. It’s a wonderful and simple way to counteract the natural “trash can smell.” I make this a weekly habit—whenever I take out the trash, I add a new peel to the clean bin. It’s an effortless change.